Analysing a network packet with Wireshark
Activity Overview
Analysing network traffic is essential for identifying the types of traffic moving to and from systems on a network. Packet capture and analysis provide valuable insights that help security and network teams understand network communications.
Network protocol analyzers like Wireshark, which features a user-friendly graphical interface, make it easier to examine complex packet data, detect patterns, and apply filters to focus on relevant traffic.
In this lab, I used Wireshark to inspect a sample packet capture file, applying filters to sort through and analyse network traffic data efficiently.
Scenario
In this scenario, using a network packet capture file, I analysed traffic data to identify key elements of a user's browsing session related to a connection to an internet site.
My tasks included filtering data to:
- Identify the source and destination IP addresses,
- Examine the protocols used during the connection,
- Analyse data packets to understand the information sent and received.
To accomplish this, I first explored Wireshark’s interface and then examined the details of a single packet to understand its protocol and data layers. I applied filters to select specific packets, inspected UDP DNS traffic for protocol data, and filtered TCP packet data to search for specific payload text. This exercise strengthened my ability to analyse network traffic and extract relevant information using Wireshark.
Task 1: Exploring Data with Wireshark
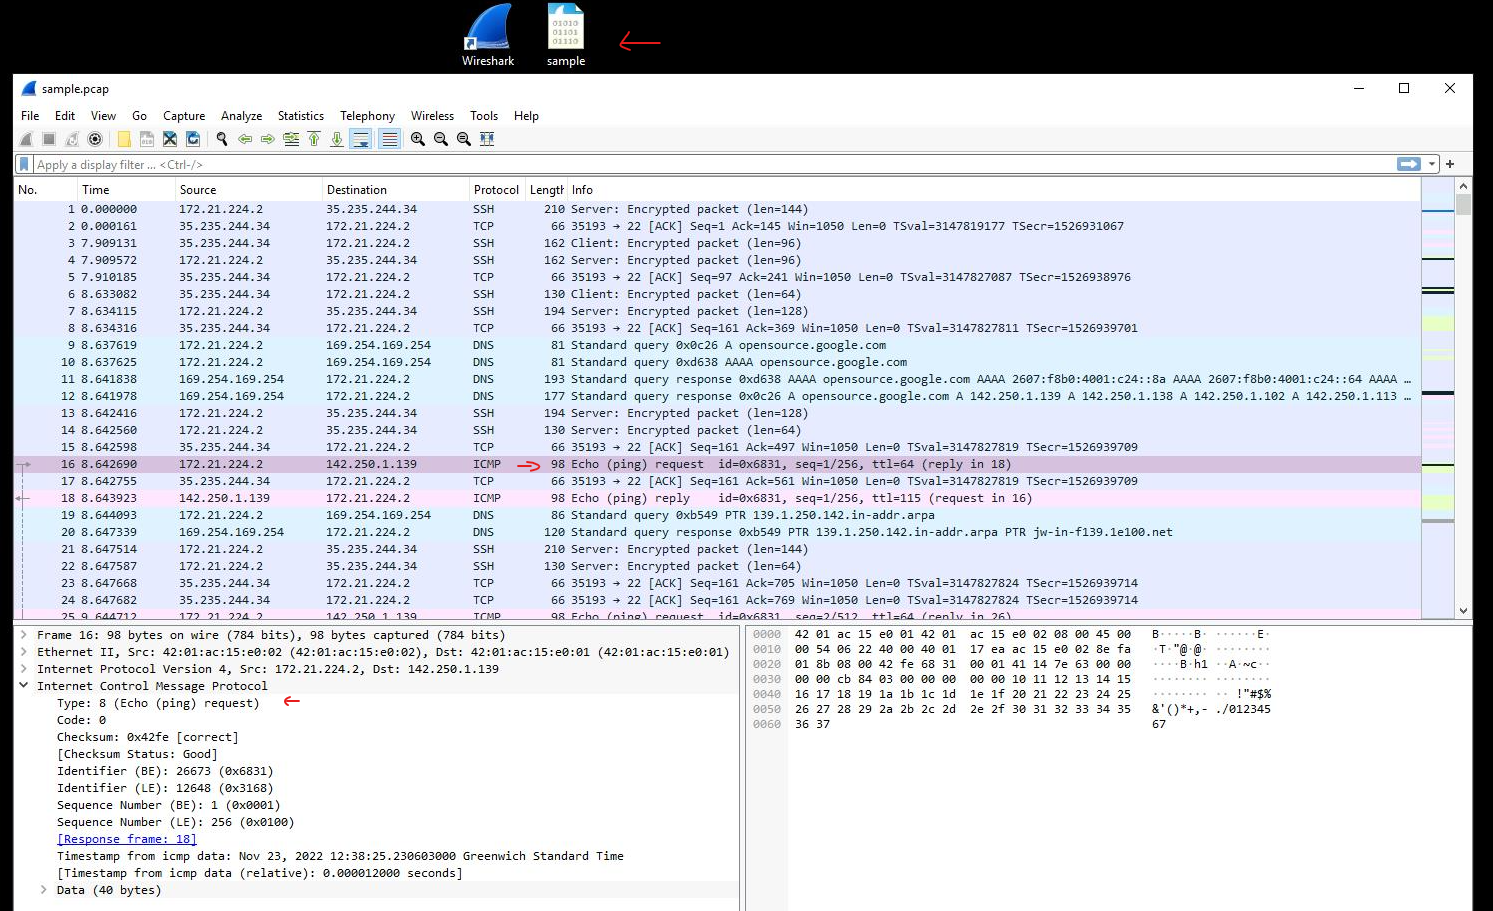
In this task, I opened a network packet already captured (.pcap) file in Wireshark to observe web request data from a system connecting to an internet site. After launching Wireshark, I explored its main interface, which displays network traffic in a three-pane view, organised by key properties for each packet:
- No.: Packet index number
- Time: Timestamp
- Source: Source IP address
- Destination: Destination IP address
- Protocol: Protocol used in the packet
- Length: Packet length
- Info: Summary of packet contents as interpreted by Wireshark
Wireshark's colouring rules help quickly identify different types of traffic. For example, DNS traffic appears in light blue, while green packets indicate TCP and HTTP protocol traffic. I scrolled through the packets until locating entries with ICMP protocol, identified by "Echo (ping) request" in the info column. This task provided insight into packet structure, protocol types, and Wireshark’s visual tools for analysing network data.
Task 2: Applying a Basic Wireshark Filter and Inspecting a Packet
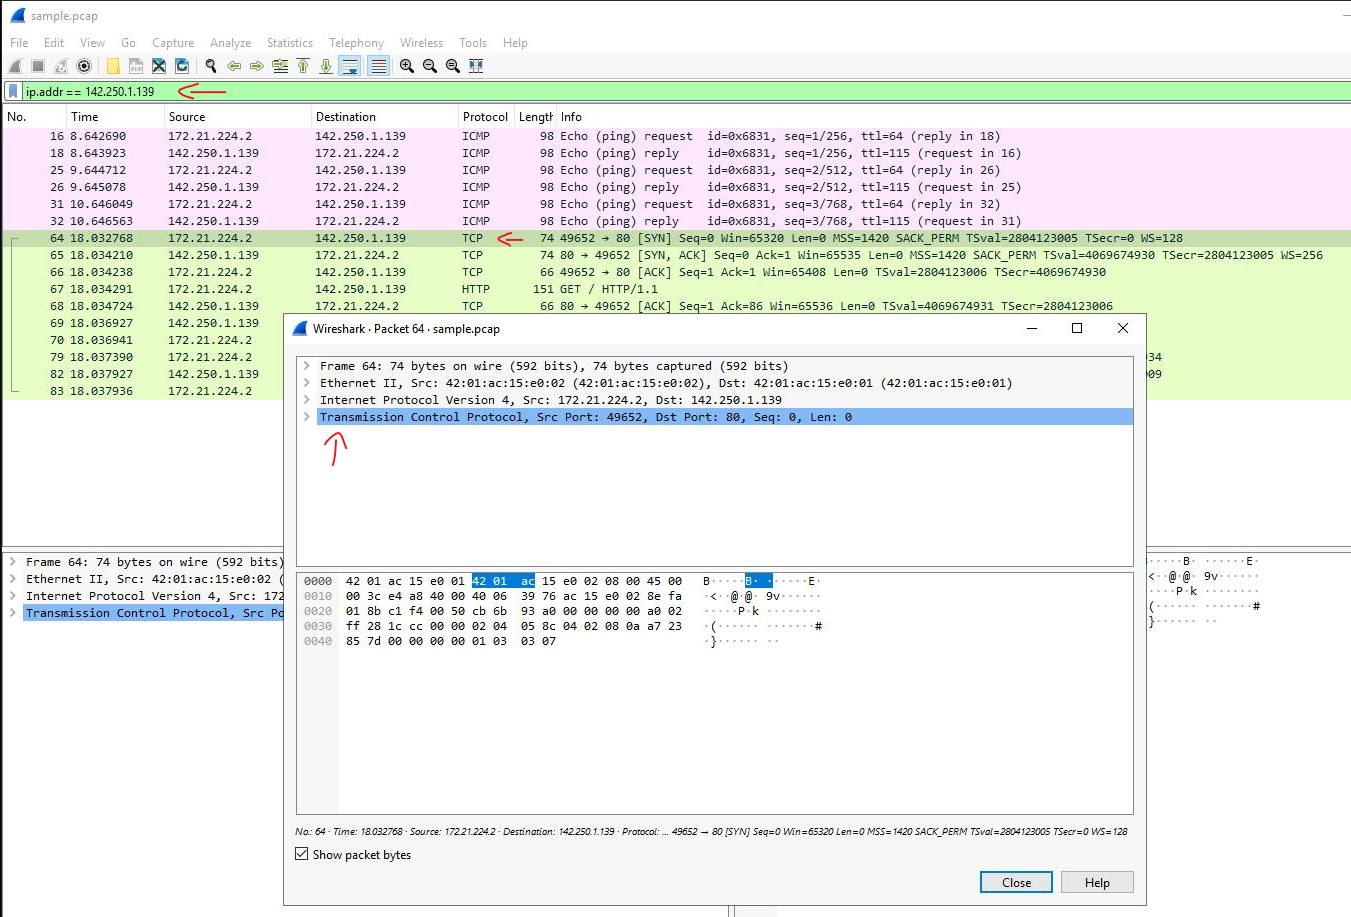
Then, I applied a basic filter in Wireshark to isolate packets associated with a specific IP address (ip.addr == 142.250.1.139). By entering this filter in the Apply a display filter box and pressing Enter, I narrowed the displayed packet list to only those where the source or destination IP matches the specified address.
With the filter applied, only two packet colors appeared: light pink for ICMP protocol packets and light green for TCP packets (including HTTP, which operates over TCP). I then double-clicked the first TCP packet to open the packet details pane, allowing for an in-depth examination of network layers and protocols.
Task 3: Using Filters to Select Packets
In this task, I applied filters in Wireshark to analyse specific network packets based on source and destination IP addresses, as well as Ethernet MAC addresses.
- Source IP Filter: I entered
ip.src == 142.250.1.139to isolate packets originating from the IP address 142.250.1.139, returning a filtered list of relevant entries. - Destination IP Filter: After clearing the previous filter, I used
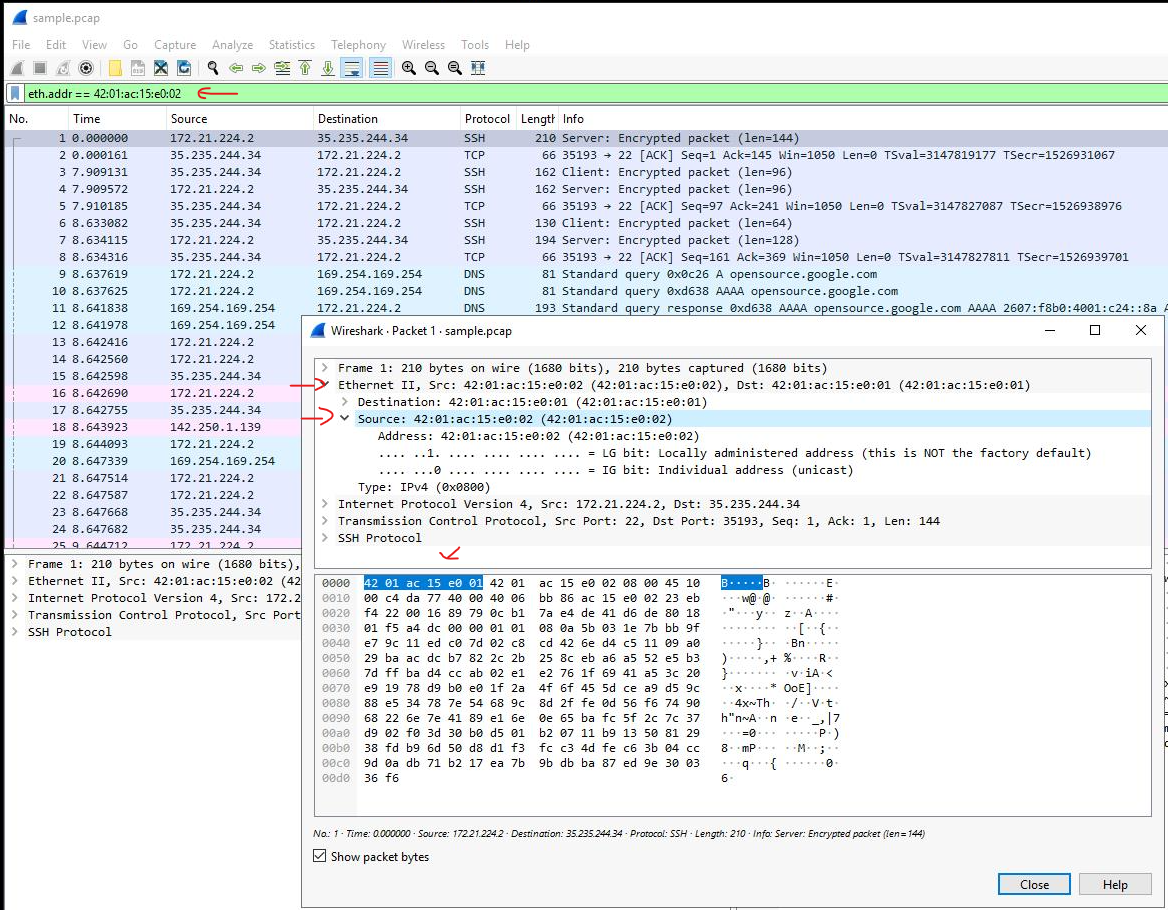
ip.dst == 142.250.1.139to display only packets sent to this IP address. - MAC Address Filter: I then filtered by MAC address (
eth.addr == 42:01:ac:15:e0:02), which captured traffic related to the specified MAC address.
After filtering, I examined the first packet in the list, expanding the Ethernet II and IPv4 subtrees to review details, including the Time to Live and Protocol fields. This task enhanced my ability to filter and analyse packet details using IP and MAC addresses in Wireshark.
Task 4: Using Filters to Explore DNS Packets
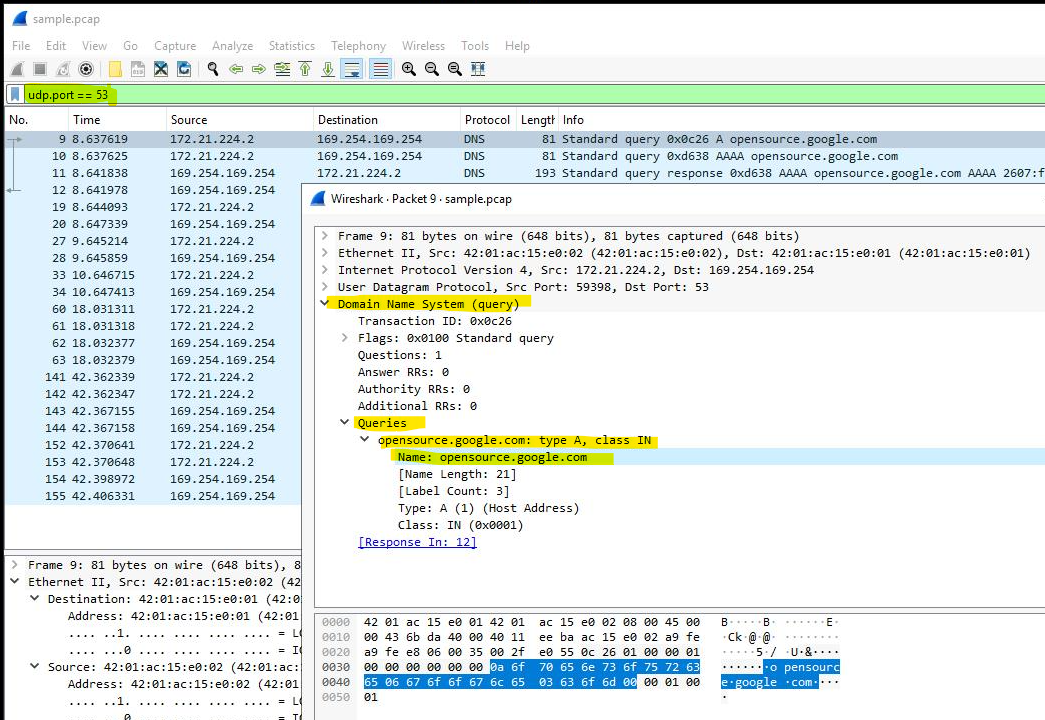
Next, I applied filters in Wireshark to analyse DNS traffic by isolating packets using UDP port 53, which is specific to DNS queries and responses.
- DNS Filter: I entered
udp.port == 53to filter only DNS-related traffic, showing packets involved in domain name lookups. - Examining Queries: I opened the first packet in the list and expanded the Domain Name System (query) section. Under Queries, I found the domain name queried, which was
opensource.google.com. - Reviewing Answers: I then inspected the fourth packet in the list, navigating to the Answers section under Domain Name System (query). This displayed the queried name (
opensource.google.com) along with its associated IP addresses.
This task demonstrated how to filter DNS traffic and examine the details of DNS queries and responses, providing deeper insight into how domain names are resolved to IP addresses.
Task 5: Using Filters to Explore TCP Packets
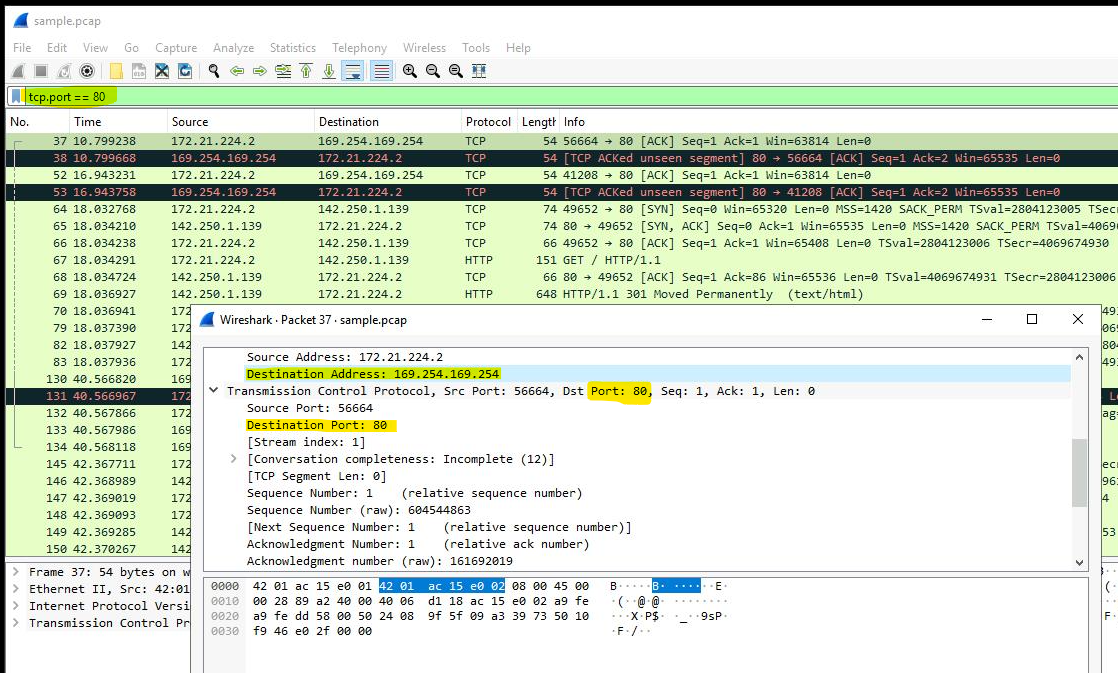
Finally, I used filters in Wireshark to focus on TCP traffic, specifically analysing packets on TCP port 80, which is associated with standard web traffic. Applying the filter tcp.port == 80 allowed me to isolate packets related to web requests, including traffic generated when accessing http://opensource.google.com.
This filters to packets containing web requests made with the curl command in this sample packet capture file.
After applying the filter, I double-clicked the first packet in the list to view its details, where I observed that the destination IP address was 169.254.169.254.
Conclusion
Through this activity, I gained hands-on experience using Wireshark to:
- Open and analyse saved packet capture files,
- View high-level packet data, and
- Apply filters to inspect detailed packet data.
This marks a significant milestone in my understanding of network packet analysis tools and my ability to examine network traffic effectively.